My View Tab
This tab enables you to customize the information you want to see in your portfolio. You can create one or more custom views to put the most important information at your fingertips. You can also define your custom view as the default view for the portfolio.
To create a new view:
1. Click Create new view. The
Edit View screen is displayed: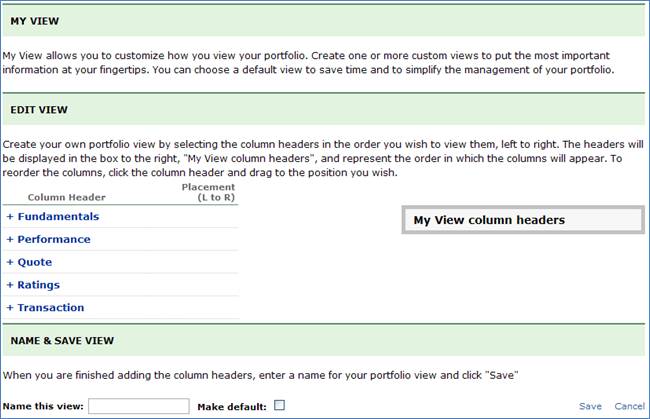
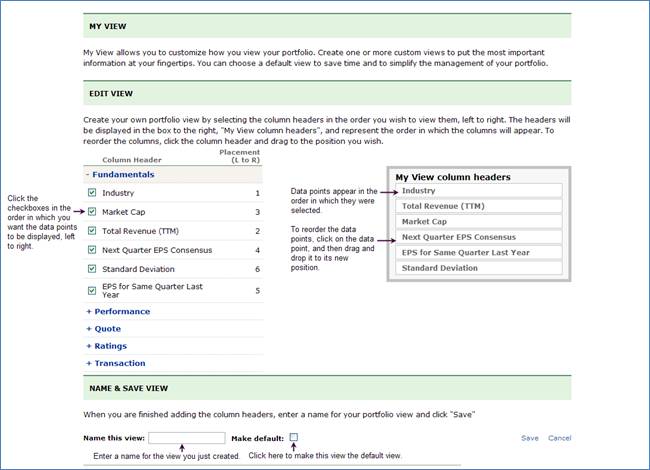
2. Click on the + sign to the right of the data point categories to view all data points in each category.
3. Create your own Portfolio view by clicking the check box next to a data point that you want to include in your portfolio. Select data points in the order you want to view them, left to right. As you select each data point, a number appears in the Placement (L to R) column. The name of the data point is displayed in the My View Column Headers box, corresponding to the order in which the columns appear in your custom portfolio view. To reorder the columns, click and drag the data point name in the column headers box to the ordered position where you want them to appear, and release the mouse.
4. When you are satisfied with the column headers and their order, enter a name for your view. You can click the Make default checkbox to choose the new view as the default view for the My View Tab.
5. When you are finished creating and naming your view, click Save to save and display your view.
6. Click Create New View to name additional views. Use the View dropdown to navigate between views.
To Edit a View:
1. Navigate to the View you want to edit and click Edit View to re-open the Edit View tool.
2. Add new data points by clicking the check box next to the new data points you want to add to your view. By default, new data points are added to the end of the list, but you can rearrange the order of the column heads by dragging and dropping the data point names in the My View Column Headers box.
3. You can rename your view or leave it the same.
4. Click the Make default checkbox to set your newly edited view as the default view.
5. Click Save to save your changes.
You can use the Time Period dropdown to select a time period for the data displayed. You can select the following:
• Today
• 5 Days
• 3 Months
• 6 Months
• 1 Year
• 3 Years
• 5 Years
Click the Widescreen View to display the My View table in widescreen. Click Normal View to return to normal view. You can use the slider bar at the bottom of the table to move left and right on the table.
